
Author

admin

Browsing

For homeowners planning a new driveway, asphalt replacement, resurfacing, or repairs, choosing the right contractor is an important decision. A well-installed asphalt surface can improve a property’s appearance, provide a comfortable driving surface, and offer dependable performance for years. However, the quality of the finished project depends greatly on the experience and workmanship of the asphalt contractor.

Although the title may refer to an asphalt company Utah businesses can trust, the same principles are highly valuable for homeowners. Residential properties have their own paving requirements, and selecting a contractor based on more than price can help homeowners avoid unnecessary repairs and disappointing results.

Look for Residential Asphalt Experience

The first step is to determine whether a contractor has experience working on residential properties. A homeowner’s driveway is different from a large commercial parking area or roadway. Residential projects often require careful attention to landscaping, property access, drainage, existing pavement, and the overall appearance of the home.

Ask prospective contractors about their experience with driveways and other residential asphalt projects. Contractors who regularly work with homeowners are generally more familiar with the concerns that matter most to residential customers.

Experience can also help contractors identify potential problems before paving begins. They can evaluate the existing surface, foundation, slopes, drainage, and surrounding property before recommending an appropriate solution.

Research the Contractor’s Reputation

Before hiring an asphalt contractor, homeowners should investigate the company’s reputation. Online reviews, testimonials, references, and examples of previous projects can provide useful information.

Look for consistent feedback about workmanship, communication, punctuality, professionalism, and customer service. A contractor may have attractive project photos, but homeowners should also consider what previous customers say about the complete experience.

If references are available, speaking with previous residential customers can provide additional insight. Ask whether the contractor completed the work as promised and whether the homeowner was satisfied with the final result.

Request a Detailed Estimate

Price is an important consideration, but homeowners should not automatically choose the lowest quote. Different estimates may include different levels of preparation, materials, labor, and finishing work.

A detailed estimate should explain what the contractor plans to do. Depending on the project, this may include removing old asphalt, preparing the base, grading the area, installing new asphalt, compacting the surface, addressing drainage, and cleaning the property afterward.

When comparing an asphalt company Utah homeowners are considering, reviewing detailed estimates makes it easier to understand the actual value offered by each contractor.

Ask About Surface Preparation

Proper preparation is one of the most important aspects of residential asphalt installation. A driveway needs a stable foundation beneath the asphalt to perform properly.

Ask contractors how they will prepare the site before paving. Depending on existing conditions, preparation may involve removing damaged pavement, repairing the base, grading the area, compacting the foundation, or correcting drainage issues.

A contractor who spends time evaluating the foundation rather than simply placing new asphalt over an existing problem is more likely to provide a long-lasting solution.

Consider Utah’s Climate

Utah homeowners should also consider local weather conditions when selecting an asphalt contractor. Seasonal temperature changes, precipitation, snow, and freezing conditions can place stress on pavement.

An experienced Utah asphalt contractor should understand how these conditions can affect residential driveways. The contractor should be able to recommend appropriate installation and maintenance practices based on the property’s location and condition.

Homeowners should ask how the company approaches projects during different weather conditions and whether the proposed schedule allows enough time for proper installation.

Evaluate Drainage Planning

Water management should never be overlooked during an asphalt project. Standing water can contribute to surface deterioration and may eventually affect the pavement’s foundation.

Before hiring a contractor, ask whether drainage will be evaluated as part of the project. The contractor should inspect slopes and identify areas where water could collect.

If drainage improvements or grading adjustments are necessary, these should be discussed before paving begins. Addressing water-related problems early can help protect the driveway and reduce future repair needs.

Ask About Materials and Workmanship

Homeowners should understand what materials will be used for their project. Ask contractors about the asphalt mix they recommend and why it is appropriate for the specific residential application.

It is also useful to ask about installation and compaction methods. Proper placement and compaction are essential for creating a stable surface.

A reputable contractor should be willing to explain the process in simple terms. Homeowners do not need technical expertise, but they should feel confident that the contractor understands the requirements of their particular property.

Compare Communication and Professionalism

The way a contractor communicates before the project can tell homeowners a great deal about what to expect later.

Pay attention to whether the company answers questions clearly, responds within a reasonable time, provides written information, and explains recommendations without unnecessary pressure.

Good communication is particularly important if unexpected conditions are discovered after work begins. Homeowners should know who to contact and how changes to the project will be handled.

Consider Top Job Asphalt

Homeowners researching an asphalt company Utah property owners can rely on may want to consider Top Job Asphalt as part of their comparison.

When evaluating Top Job Asphalt or any other residential asphalt contractor, homeowners should look at factors such as experience, project quality, preparation practices, communication, and the services provided. A contractor should be able to explain what a driveway needs and why a particular solution is recommended.

Taking time to compare these qualities can help homeowners choose a contractor based on overall value rather than simply selecting the first company they find.

Ask About Repairs and Maintenance

A professional asphalt contractor should understand that paving does not end when the equipment leaves the property. Homeowners also need guidance about maintaining the new surface.

Ask contractors what they recommend for dealing with cracks, potholes, drainage concerns, and general surface wear. Early maintenance can help prevent minor problems from becoming more serious.

It is also helpful to ask whether the contractor offers repair, resurfacing, or maintenance services in the future. Having an established contractor available when problems occur can make property maintenance easier.

Review the Agreement Carefully

Before signing a contract, homeowners should read the entire agreement. The document should clearly identify the work being performed, expected costs, payment requirements, and other important project details.

Make sure there are no unclear charges or assumptions about what is included. If preparation, removal, drainage improvements, or cleanup are necessary, homeowners should understand whether those services are part of the quoted price.

Never hesitate to ask questions about terms that are unclear. A professional contractor should be willing to explain the agreement before work begins.

Do Not Focus Only on the Cheapest Option

Choosing an asphalt contractor solely because of a low price can sometimes create problems later. An inexpensive estimate may not include the same level of preparation, materials, workmanship, or service as a more comprehensive proposal.

Instead, homeowners should compare the complete package. Consider the contractor’s experience, reputation, preparation process, materials, communication, drainage planning, warranty or service policies, and overall value.

The goal is not simply to spend the least amount of money. It is to select a contractor capable of completing the project correctly and providing a durable surface that meets the property’s needs.

Final Thoughts

Choosing the right asphalt contractor requires more research than simply searching for an asphalt company Utah homeowners can find online. Residential property owners should compare contractors based on experience, reputation, preparation, materials, drainage planning, communication, estimates, and long-term service.

Companies such as Top Job Asphalt can be included in the comparison as homeowners evaluate their available options. Taking time to ask questions and review proposals can help property owners make a confident decision.

Whether the project involves a new driveway, resurfacing, repairs, or complete asphalt replacement, selecting a qualified residential contractor is an investment in the property’s appearance, usability, and long-term value. By comparing contractors carefully before hiring, homeowners can greatly improve their chances of receiving quality asphalt work that meets their expectations.

You want to drink your morning coffee without making eye contact with the person next door. Fair.

Whether the neighbor is a few feet away, looking down from a second-story window, or just a little too visible over a short fence, there is a privacy solution that fits your space, your budget, and your style.

The trick is matching the right barrier to your exact situation. A ground-level neighbor and a two-story window need very different answers.

Quick answer: The best options fall into four groups: built structures (privacy fences, wood-slat screens, pergolas, lattice panels), living barriers (hedges, evergreens, bamboo in planters, climbing vines on a trellis), soft screens (mesh panels, outdoor curtains, shade sails), and layered combinations of all three. The single most important decision is not what you build but where you place it. Screening close to your seating area blocks more of the view with far less material than a wall on the property line.

What are the main ways to add privacy between houses?

Every solution is a variation on four categories. Pick based on how fast you need coverage, how much you want to spend, and how it should look.

Type Examples Speed Look Best for
Built structures Privacy fence, slat screen, pergola, lattice Instant Clean, architectural Immediate, defined privacy
Living barriers Hedges, evergreens, bamboo, climbing vines Slow to grow Natural, soft Long-term, greener screening
Soft screens Mesh panels, outdoor curtains, shade sails Instant Casual, flexible Renters and adjustable privacy
Layered mix Structure plus plants plus soft elements Mixed Rich and deliberate The most private and stylish result

Built structures: fast, defined privacy

When you want privacy now, you build it.

Privacy fence. The classic. If the neighbor is very close, a solid fence with boards butted together (no gaps) gives full screening. If they are farther off, a slat or trellis-style fence looks nicer and still does the job.

Staggered or slatted screen. Wooden planks set at varying heights or with small gaps create an eye-catching screen that still lets air through. You can adjust the gap size to trade a little privacy for more light and breeze. Staggered designs handle wind better than a solid wall.

Freestanding screen or partition. A standalone panel you place exactly where the sightline is. Build it, move it, or cover it in vines. Very flexible.

Pergola or partially enclosed structure. Great over a patio, and the overhead element is what you need when the neighbor is looking down from above.

Lattice panels. Affordable, light, and perfect as a base for climbing plants. Flank a lattice screen with outdoor curtains for a soft, finished look.

Living barriers: natural and beautiful

Plants soften everything and, over time, disappear the boundary into greenery.

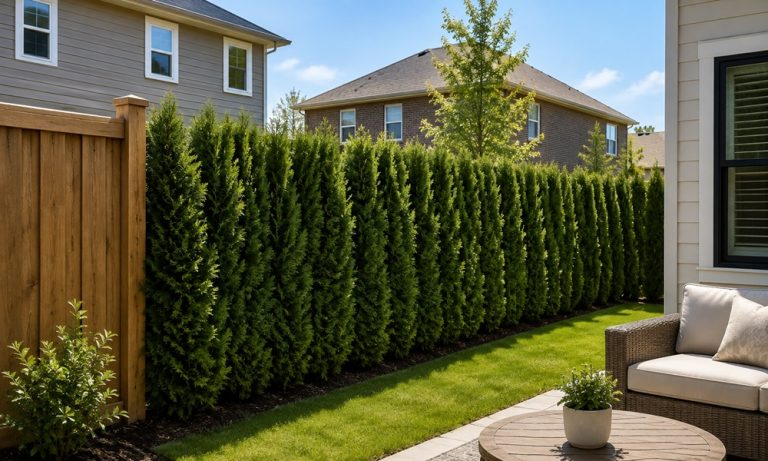
  • Evergreen hedges and trees give year-round coverage. The trade-off is patience, since most take years to fill in.
  • Bamboo in large planters grows fast and tall for a quick green wall. Use containers or a root barrier so it does not spread where you do not want it.
  • Climbing vines on a trellis or arbor are the shortcut. A trellis gives instant structure, and vines like jasmine or ivy cover it within a season or two.
  • Tall ornamental grasses in planters offer a movable, feathery screen for decks and patios.

A smart move: plant fast growers in front of slow growers. The fast plants screen you now while the permanent hedge matures behind them.

Soft screens: flexible and renter-friendly

No digging, no permits, no commitment.

  • Mesh privacy panels attach to gazebos, pavilions, and railings. Look for zippered panels so you can switch between full privacy and open air.
  • Outdoor curtains on a rod or wire give a resort-patio feel and pull open when you want the view back.
  • Shade sails and canopies block the overhead sightline from a two-story neighbor and add welcome shade.
  • Planters on wheels let you roll a screen into place for a party and roll it away after.

The placement secret most guides get backward

Here is the insight that changes everything, and almost every listicle misses it.

Your instinct is to build a barrier right on the property line. Landscape architects say that is often the wrong spot.

Screen close to where you actually sit, not at the far boundary.

Why it works comes down to a cone of vision. You do not need to block the whole yard. You only need to interrupt the specific line of sight between the neighbor’s eyes and your chair. A small screen a few feet from your seating area covers that sightline completely.

The same screen placed at the property line, thirty feet away, would need to be enormous to block the same view.

Placing screens closer to the house has a second benefit: counterintuitively, it makes the yard feel bigger, because you are not walling off the whole space, only the part you use.

So before you price out fifty feet of fencing, sit in your favorite spot and notice exactly where the neighbor appears. Block that. You will spend less and enjoy an open yard.

What about a two-story neighbor looking down?

A ground-level fence does nothing against a second-floor window. You need height or an overhead element.

  • A pergola, gazebo, or shade sail breaks the downward sightline.
  • Tall trees or bamboo placed to intercept the view work over time.
  • A taller trellis with a top canopy blocks the angle from above.

You can also, gently, share ideas with the neighbor for screening on their side. Sometimes the easiest privacy fix is a friendly conversation.

Do not forget sound privacy

Visual privacy is only half of feeling unwatched. A water feature or small fountain masks conversation and traffic noise with a pleasant sound. Choose a flow level that soothes rather than overwhelms, and it doubles as an attractive focal point.

Check the rules before you build

A quick reality check saves headaches:

  • Height limits. Many areas cap fence height, especially in front yards.
  • Setbacks and property lines. Know exactly where your line is before you dig. A misplaced fence is an expensive mistake.
  • Permits. Larger structures may need approval and submitted plans.
  • HOA rules. If you have a homeowners association, check what materials and heights are allowed.
  • Local ordinances. Rules vary widely by location, so confirm what is permitted where you live.

Frequently asked questions

What is the cheapest way to get privacy from neighbors?

Soft screens are the cheapest instant fix: mesh panels, outdoor curtains, or a lattice with climbing vines. Planters on wheels and a single well-placed freestanding screen also deliver a lot of privacy for little money.

What is the fastest-growing plant for privacy?

Bamboo in containers is one of the fastest tall screens. Climbing vines on a trellis also fill in quickly. For instant green, plant fast growers in front of a slower permanent hedge.

Where should I place a privacy screen?

Close to your seating area, not on the property line. A small screen near where you sit blocks the exact line of sight with far less material, and it keeps the yard feeling open and larger.

How do I get privacy from a second-story neighbor?

Use height and overhead cover. A pergola, shade sail, tall trees, or a trellis with a canopy breaks the downward angle that a normal fence cannot reach.

Do I need a permit to put up a privacy screen?

It depends on where you live and how large the structure is. Freestanding screens and planters usually do not, while taller fences and permanent structures often do. Check local rules and any HOA guidelines first.

A full bathroom remodel can run anywhere from a couple thousand to well over fifteen thousand. For a room you might only stand in for ten minutes at a time, that is a lot.

The best part: you do not need to knock down a wall to make a small bathroom feel bigger. You need to trick the eye. Space is partly real and partly perceived, and perception is cheap to change.

This guide is organized by effort, from five-minute swaps to weekend projects, so you can start wherever your time and budget allow.

Quick answer: Make a small bathroom feel bigger by maximizing light, reflection, and visual continuity. Hang a large mirror, use light colors on walls and ceiling, keep surfaces uncluttered, swap a shower curtain for clear glass, and keep the floor visible with a floating vanity or slim storage. The eye reads a bright, continuous, clutter-free room as larger, even when the square footage never changes.

What actually makes a small bathroom feel bigger?

Three levers do most of the work.

Light. Bright rooms feel open. Dark rooms feel like closets.

Reflection. Mirrors and glossy surfaces bounce light and images around, so the walls seem to recede.

Continuity. The fewer visual breaks, the bigger the room reads. Matching colors, uncluttered surfaces, and a visible floor all reduce the “chopped up” feeling that shrinks a space.

Keep those three in mind and every tip below makes sense.

Five-minute wins (do these first)

Start here. No tools, no spending, instant payoff.

  • Clear the vanity. A crowded countertop is the fastest way to make a small bathroom feel cramped. Store toiletries out of sight. A clean surface instantly opens the room.
  • Remove the bathmat when guests come. A small rug chops the floor into pieces. A visible, continuous floor looks larger.
  • Tidy the sightlines. Get rid of the magazine rack, the visible plunger, the cluster of half-used bottles. Less stuff on display equals more perceived space.
  • Swap in a plush white towel set. White reads clean and bright and matches almost any palette.

Under-fifty upgrades

A little money, a big shift.

  • Hang the biggest mirror you can. This is the oldest trick because it works. A large mirror, or a mirrored wall, reflects light and doubles the visual depth of the room. Round frames soften a boxy space. If you can, place the mirror opposite a window to bounce natural light.
  • Switch to daylight bulbs. Warm dim bulbs make a small room feel like a cave. Bright, clean light around 5000K reflects off tile and mirror and lifts the whole space. Add sconces beside the mirror if you can.
  • Add slim wall storage. No-drill adhesive organizers, floating shelves, or a wall-mounted rack free up the floor and counter. Vertical storage keeps essentials handy without eating space.
  • Store loose items in baskets. Woven baskets or clear containers hide clutter and add a calm, intentional look.

Weekend projects (still no demolition)

More effort, more transformation, and none of it requires tearing out plumbing.

  • Paint the walls and ceiling a light, single color. Soft white, cream, or a pale tone maximizes reflected light. Painting the ceiling the same light color removes the visual “lid” and makes the room feel taller. A semi-gloss or gloss finish reflects even more light.
  • Trade the shower curtain for a clear glass panel or frameless door. A curtain acts like a wall that cuts the room in half. Clear glass lets the eye travel all the way to the shower’s back wall, so the whole room reads as one continuous space. This is one of the single most effective changes you can make.
  • Continue one material up the wall. Extending tile or paint from the floor up a wall, without stopping partway and adding a trim break, creates a seamless surface that tricks the eye into reading more height and volume.

The principle the top articles skip: protect the sightline to the floor

Here is the idea that ties every trick together, and most listicles never name it. The brain estimates room size largely from how much floor and how much continuous surface it can see.

So the real goal is not “add mirrors.” It is: let the eye travel as far as possible without hitting a break.

That reframes your choices:

  • A floating vanity or a pedestal sink shows the floor continuing underneath it. Visible floor reads as more floor. A big boxy cabinet hides it and shrinks the room.
  • Clear glass beats a curtain because the eye reaches the far wall.
  • A wall-hung or slim toilet keeps more floor in view.
  • Long, unbroken lines, like floor-to-ceiling tile or a full-height mirror, pull the eye and stretch the space.
  • One dominant color avoids the choppy, busy look that makes small rooms feel smaller.

Once you optimize for the sightline, the individual tips become obvious.

Quick reference: effort versus impact

Change Effort Cost Space illusion
Clear the counter 5 min Free High
Remove the bathmat 1 min Free Medium
Large mirror 30 min Low Very high
Daylight bulbs 5 min Low Medium
Clear glass shower panel Weekend Medium Very high
Light paint, walls and ceiling Weekend Low High
Floating shelves or wall storage 1 hour Low High

What to avoid in a small bathroom

  • Too many patterns and finishes. Visual noise makes a room feel busy and tight. Pick one palette and commit.
  • Dark, heavy colors on every surface. A single bold accent wall can add depth, but wrapping the whole room in dark tones usually closes it in.
  • Freestanding clutter. Floor bins, extra decor, and bulky furniture steal the floor space that makes a room feel open.
  • Tiny scattered decor. Many small objects read as clutter. One considered plant or tray reads as calm.

Frequently asked questions

What color makes a small bathroom look bigger? Light, cool neutrals win: soft white, pale grey, cream, or a light blue. They reflect the most light. A glossy or semi-gloss finish amplifies the effect by bouncing light around the room.

Do mirrors really make a bathroom look bigger? Yes, more than almost anything else. A large mirror reflects light and adds visual depth. Placing it opposite a window or across from another mirror multiplies the effect and can make a wall seem to disappear.

Should I remove the shower curtain? If your goal is a bigger-feeling room, yes. Swapping a curtain for a clear glass panel lets the eye see straight through to the shower wall, so the room reads as one open space instead of two boxes.

Can I make a small bathroom look bigger for under twenty dollars? Yes. Decluttering the counter is free, and a bright bulb, a simple frame kit for the mirror, or a set of adhesive shelves each cost very little and change how the room feels immediately.

Does floor-to-ceiling tile make a bathroom look bigger? It can, especially in a light color with minimal grout lines. Running tile up the wall draws the eye upward and creates a continuous surface, which makes the room feel taller and more spacious.

Search “Donnie Swaggart house” and you get a flood of confident detail. Ten bedrooms. A $1.5 million price tag. Precise square footage. Interior photos. A private pool.

There is a problem. Almost none of it is verified.

This article does something the ranking pages do not. It separates what is actually on the public record about Donnie Swaggart from what is repeated across websites without a single source behind it. If you came here for a fact-checked answer instead of recycled guesswork, this is it.

Quick answer: There is no verified public record of a specific “Donnie Swaggart mansion.” Donnie Swaggart is an evangelist and co-pastor at Family Worship Center in Baton Rouge, Louisiana, where Jimmy Swaggart Ministries is based. Popular figures like “10 bedrooms,” “5,452 square feet,” and “$1.5 million” come from content-farm articles, not property records or reputable reporting, and some of those figures contradict each other. His exact residence, its value, and its interior are not publicly documented.

Who Is Donnie Swaggart?

Start with what is solid, because the verified biography is where trust begins.

Donnie Swaggart is an American Pentecostal evangelist and pastor. He serves as an evangelist and pastor of Family Worship Center Church in Baton Rouge, Louisiana, and as Executive Vice-President of Jimmy Swaggart Ministries. He is the only son of televangelist Jimmy Swaggart and Frances Swaggart.

A few verified basics:

Detail Verified information
Role Evangelist, co-pastor of Family Worship Center; Executive VP of Jimmy Swaggart Ministries
Based in Baton Rouge, Louisiana
Family Married to Debbie Swaggart; three children, including Gabriel Swaggart
Ministry work Regular on SonLife Broadcasting Network programming, including “Frances & Friends”
Lineage Only son of Jimmy and Frances Swaggart

Jimmy Swaggart Ministries owns and operates the SonLife Broadcasting Network and the Jimmy Swaggart Bible College, and Jimmy Swaggart was the senior pastor of Family Worship Center in Baton Rouge. The ministry, founded in 1984, is now led in part by Donnie and his son Gabriel, and Family Worship Center functions as a megachurch.

That is the reliable core. Now the part everyone actually searches for.

Where Does Donnie Swaggart Live?

The honest answer is broad, not pinpoint. Donnie Swaggart lives in the Baton Rouge, Louisiana area, where the ministry is headquartered. That much is consistent with the public record, since the family’s entire life and work center on the ministry campus there.

Jimmy Swaggart Ministries sits in Baton Rouge on a campus that spreads across roughly one hundred acres. The family’s homes are understood to be in the same region.

Beyond “Baton Rouge area,” there is no verified, publicly documented address, and this article will not attempt to pinpoint a private residence. That restraint is deliberate. Real property records, not blog estimates, would be the only reliable source for an exact location, and none is cited by the pages making specific claims.

What Do Websites Claim About the Donnie Swaggart Mansion?

Here is where the internet gets loud and unreliable. Multiple sites repeat a similar set of “facts.” For transparency, here is what they claim, clearly labeled as unverified.

Claim you will see online Status
Worth around $1.5 million Unverified estimate, no source cited
10 bedrooms Unverified, and paired with contradictory bathroom counts
“2.5 bathrooms” alongside 10 bedrooms Internally incoherent, a red flag for fabrication
Roughly 5,000 to 5,452 square feet Unverified, figures vary by source
Built in the 1980s Unverified
Private pool, circular driveways, balconies Unverified, no primary source
Detailed interior photos and descriptions Appear to be stock or generated images, not the actual home

Notice the tell. A house described as having ten bedrooms but only two and a half bathrooms is not a real floor plan. When numbers like that travel from site to site unchanged, it usually means one fabricated post seeded the rest.

Are the Donnie Swaggart House Details Actually Verified?

No. And this is the single most useful thing this page can tell you.

The specific “mansion” details fail every basic verification test:

  • No property record is cited. Home value and square footage would come from parish assessor or real estate records. None is referenced.
  • No reputable reporting exists. Mainstream outlets have covered the Swaggart family extensively, yet the mansion specs appear only on content farms.
  • The figures contradict each other. Square footage and room counts shift between sources, which does not happen with documented facts.
  • First-person “tours” are fabricated. Some pages claim a personal visit or a historian’s private access. These read as invented narrative devices, and the “interior” images do not match a specific, identifiable home.

So when a page states the house is “5,452 square feet, worth $1.5 million, with 10 bedrooms,” treat it as fiction dressed up as fact. The truthful position is simpler. The details of Donnie Swaggart’s actual residence are not part of the verified public record.

How Much Is Donnie Swaggart Worth?

You will see net worth figures ranging from around $1 million upward. Treat these the same way as the house claims: unverified estimates with no disclosed methodology.

Net worth numbers for ministers are especially unreliable because personal wealth and ministry assets are separate things that these articles routinely blur. A ministry can control significant property, broadcasting infrastructure, and land while an individual pastor’s personal finances remain private and undocumented. Conflating the two inflates the number and misleads the reader.

Bottom line: no credible, sourced figure for Donnie Swaggart’s personal net worth is publicly available. Anyone stating one precisely is guessing.

Why Is There So Much Interest in Televangelists’ Homes?

This search behavior is not random, and understanding it explains the whole genre.

Televangelists occupy a unique spot in public curiosity. They ask viewers for donations, they preach on television, and they lead large ministries. Naturally, people wonder how that money translates into lifestyle. Questions about mansions, jets, and salaries follow almost any high-profile preacher.

The Swaggart name carries extra weight here for a documented reason. Jimmy Swaggart, Donnie’s father, was at the center of two of the most famous televangelist scandals in American history. That history keeps public attention on the family and fuels curiosity about how they live.

Threads on Reddit and Quora about televangelist wealth tend to circle the same honest tension. Commenters want transparency about ministry finances, and they are often skeptical of both the preachers and the gossip sites claiming to expose them. The recurring, sensible takeaway in those discussions is to distrust any “net worth” or “mansion” number that arrives without a source. That skepticism is well placed.

What Is the Documented History of Swaggart Family Wealth and Controversy?

This is the real, sourced context that the churn articles skip, and it is far more substantive than an invented floor plan.

The 1988 scandal and its fallout. Despite a tearful on-air apology in February 1988, Jimmy Swaggart was defrocked by the Assemblies of God in April, then continued as an independent Pentecostal preacher. The televised “I have sinned” speech became one of the most replayed moments in broadcast religion.

The 1991 incident. In October 1991, police in Indio, California, found Swaggart with a sex worker after a traffic stop. This was the second such incident.

A costly legal battle. During that period, Swaggart lost a $10 million defamation suit tied to accusations he had made against a fellow minister, and the parties later settled out of court for $1.85 million.

The handover to Donnie. After the scandals, Jimmy Swaggart turned control of Jimmy Swaggart Ministries over to his son, Donnie. This is why Donnie’s name is now central to the ministry’s leadership.

A broader controversy. Through the 1980s, Jimmy Swaggart Ministries was among American evangelical groups that promoted the South African-backed Mozambican group RENAMO, which was accused of systematic war crimes, and the ministry faced repeated accusations of providing support to the group.

The comeback and current scale. Swaggart rebuilt through radio and later the internet, and his ministry continued through The Evangelist magazine and the Family Worship Center in Baton Rouge. Today the ministry operates the 24-hour SonLife Broadcasting Network from its Baton Rouge campus.

That documented record is the legitimate reason people are curious about Swaggart family wealth. It is also a reminder that the interesting, verifiable story has nothing to do with a fabricated bedroom count.

How Do You Tell Reliable Info From SEO Churn on Topics Like This?

Since this whole topic is a minefield of fake precision, here is a practical filter you can apply to any “celebrity house” or “net worth” article.

  • Look for a cited source. Real property facts come from assessor records or real estate listings. No citation means no fact.
  • Check for internal contradictions. Ten bedrooms and two bathrooms is a fabrication tell. So are square footage figures that change between sites.
  • Be wary of first-person “tours.” Claims of rare private access, especially without verifiable photos, are usually narrative filler.
  • Separate the person from the ministry. Organizational assets are not personal net worth. Articles that blur the two are inflating numbers.
  • Cross-check against reputable outlets. If only content farms carry a “fact,” it probably is not one.

Apply that filter to the Donnie Swaggart mansion claims and almost all of them fail.

Frequently Asked Questions

Does Donnie Swaggart live in a mansion? There is no verified public record describing a specific Donnie Swaggart mansion. He lives in the Baton Rouge, Louisiana area near the ministry, but the widely repeated details about size, value, and interior are unsourced and unverified.

How much is the Donnie Swaggart house worth? No credible, sourced valuation exists. The “$1.5 million” figure circulating online has no property record or reputable report behind it and should be treated as unverified.

Where is Donnie Swaggart’s house located? Only the general area is supported by the public record: the Baton Rouge, Louisiana region, where Jimmy Swaggart Ministries is headquartered. No verified exact address is publicly documented.

Is Donnie Swaggart related to Jimmy Swaggart? Yes. Donnie Swaggart is the only son of televangelist Jimmy Swaggart and Frances Swaggart, and he serves in the ministry his father founded.

Why do so many sites list specific details about the house? Because “celebrity house” and “net worth” content is a high-traffic SEO genre. Many pages copy figures from one another without verification, which is how contradictory and fabricated specifics spread.

What is Donnie Swaggart’s role today? He is an evangelist and pastor at Family Worship Center in Baton Rouge and serves as Executive Vice-President of Jimmy Swaggart Ministries, appearing regularly on SonLife Broadcasting Network programming.

This article distinguishes verified public-record information from unverified claims circulating online. Where specific figures about a private residence could not be confirmed by a reliable primary source, they are labeled as unverified rather than presented as fact.

Outdoor cushions take a beating. Sun, rain, pollen, sunscreen, spilled drinks, bird droppings, and the odd muddy paw all land on the same seat you want to relax on.

Most guides tell you to scrub with soapy water and rinse. That works, until it does not. Use the wrong cleaner and you strip the fabric’s water repellency. Skip the drying step and mold grows back inside the foam within days.

This guide fixes both problems. You will learn how to clean outdoor cushions by fabric type, lift mold and mildew, remove stubborn stains, and dry them so the mildew does not return.

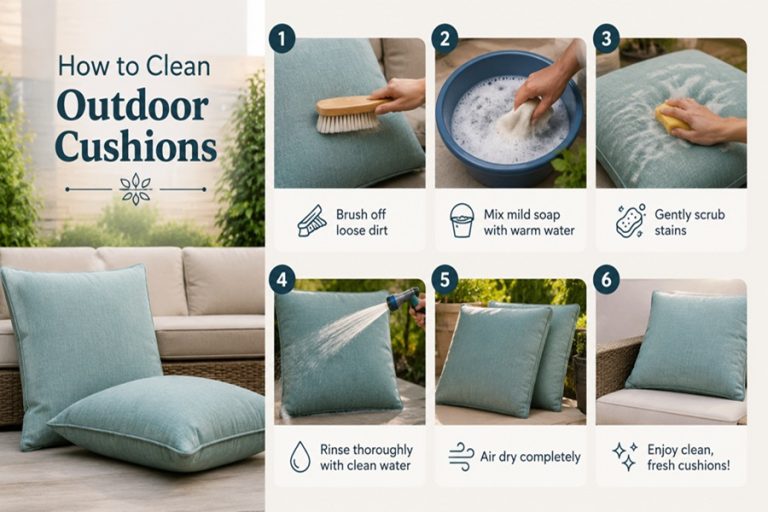
To clean outdoor cushions, brush off loose debris, vacuum the seams, then scrub with a soft brush and a mix of a few drops of dish soap per gallon of warm water. Rinse thoroughly with a hose. For mold or mildew, use a white vinegar solution on most fabrics, or a diluted bleach and soap solution on solution-dyed acrylic like Sunbrella. Always air dry the cushions completely, standing on their side, before storing them. Test any cleaner on a hidden corner first.

What Is the Fastest Way to Clean Outdoor Cushions?

If you only have twenty minutes and the cushions are dirty but not moldy, use this quick routine.

  1. Brush and shake. Knock off loose dirt, pollen, and crumbs. Cleaning dirt into wet fabric only spreads it.
  2. Vacuum the seams. Crumbs and spores hide in the piping, buttons, and zipper channels.
  3. Mix a gentle solution. A few drops of dish soap or a small amount of liquid laundry detergent per gallon of warm water is enough.
  4. Scrub gently. Use a soft-bristle brush in small circles. Focus on stained spots.
  5. Rinse fully. Leftover soap attracts dirt faster than bare fabric does.
  6. Air dry on their side. Stand cushions up so water drains out instead of pooling in the foam.

That covers routine grime. For mold, tough stains, or a full seasonal reset, keep reading. The method that keeps your cushions safe depends on what they are made of.

How Do You Know What Your Outdoor Cushion Fabric Is Made Of?

This is the step almost every article skips, and it is the one that decides everything. The same cleaner that is safe on one fabric fades or ruins another.

Check the care tag first. If the tag is gone, most manufacturers list care instructions on their website. If you still cannot tell, match the feel and behavior below.

Fabric type How to spot it Bleach safe? Best cleaner
Solution-dyed acrylic (Sunbrella and similar) Canvas-like, color runs all the way through the fiber, dries fast Yes, diluted Mild soap and water, or diluted bleach for mold
Olefin / polypropylene Soft, lightweight, budget outdoor sets No Mild soap and water, oxygen bleach
Polyester (printed) Pattern printed on top, color fades if scratched No Mild soap, white vinegar
Cotton or cotton blend Soft, absorbs water, slow to dry No Mild soap, machine wash if removable

Why it matters: solution-dyed acrylic is colored in the raw fiber before it is woven, so bleach cannot pull the color out. Printed polyester and dyed cotton hold color only on the surface, so bleach strips it. When in doubt, treat the fabric as bleach-sensitive and reach for vinegar or oxygen bleach instead.

One more truth worth knowing. Fabrics like Sunbrella are marketed as mildew resistant, but that does not make them mildew proof. Mildew still grows on the dirt, pollen, and sunscreen sitting on top of the fabric. Keep the surface clean and you starve the mildew of what it feeds on.

What Supplies Do You Need to Clean Outdoor Cushions?

You likely have most of this already.

  • Soft-bristle brush (a hard brush frays the weave)
  • Bucket
  • Garden hose or spray bottle
  • Handheld vacuum or vacuum with a crevice tool
  • Mild dish soap or liquid laundry detergent
  • Distilled white vinegar
  • Baking soda or cornstarch (for oil stains)
  • Oxygen bleach such as OxiClean (for tough stains on non-acrylic fabric)
  • Chlorine bleach (only for solution-dyed acrylic mold)
  • Microfiber cloths
  • Rubber gloves
  • A tarp or clean hard surface to work on

Work on a deck, driveway, or tarp. Never clean cushions directly on grass, since you will trade dirt stains for grass and mud stains.

How Do You Deep Clean Outdoor Cushions Step by Step?

This is the full method for cushions that need more than a quick wipe. It suits a start-of-season refresh or a mid-summer rescue.

  1. Prep the area. Lay a tarp on a flat, hard surface. Start early in the day so cushions have hours of daylight to dry.
  2. Remove loose debris. Brush and shake each cushion, then vacuum the seams, piping, and buttons where spores collect.
  3. Pretreat visible stains. Spray a 50/50 mix of white vinegar and warm water on dark spots. Let it sit for fifteen to twenty minutes.
  4. Mix your cleaning solution. For routine cleaning, use a few drops of dish soap or a squirt of laundry detergent per gallon of warm water.
  5. Scrub seam to seam. Dip the soft brush and work the whole surface in gentle circles, not just the stain. Cleaning the entire panel prevents water rings and blotchy clean patches.
  6. Let it dwell. Give the solution three to five minutes to break down grime before rinsing.
  7. Rinse until the water runs clear. Use a hose on a normal setting. Soap left in the fabric attracts new dirt.
  8. Squeeze and stand to dry. Press out excess water, then stand each cushion on its edge so water drains from the foam. Finish in direct sun if you can.

The seam-to-seam habit in step five comes straight from professional fabric-care guidance. Spot cleaning only the stain often leaves a visible ring where the clean patch meets the dirty fabric. Clean the whole panel and the color stays even.

Can You Machine Wash Outdoor Cushion Covers?

Sometimes, and it is the easiest option when it is allowed.

Check for a zipper. If the cover unzips and the care tag permits it, machine washing saves real effort. Follow these rules:

  • Close every zipper before washing so nothing snags.
  • Use cold water and the delicate or gentle cycle.
  • Use a small amount of mild detergent.
  • For solution-dyed acrylic with severe mildew, you can add a cup of bleach, but confirm with the furniture maker first.
  • Never machine dry. Air dry only, since heat can shrink covers and warp the fit.

Not all covers are removable, and not all removable ones are washable. When the tag says spot clean only, respect it. Cushion construction varies, and a shrunken cover will never zip back over its foam again.

Should You Pressure Wash Outdoor Cushions?

This is one of the most debated questions online, and the honest answer is: usually no.

A pressure washer can work, but only on a low-pressure nozzle held well back from the fabric. Get too close, or use a high-pressure tip, and the jet tears the weave and blasts water deep into the foam.

That last part is the real risk. Across home and patio threads on Reddit and DIY blogs, the recurring warning is the same. Pressure washing forces water into the foam core, and foam that stays wet inside grows mold you cannot see or reach. People who tried it often report cushions that smelled musty within a week, even though the surface looked spotless.

The practical takeaway from that community consensus:

  • For routine cleaning, skip the pressure washer entirely. A soft brush and a hose do the job with none of the risk.
  • If you insist on a pressure washer, use the lowest pressure, keep a safe distance, and plan for a very long, thorough drying period.
  • After any deep soak, dry the foam completely before the cushions go back on the furniture.

Steam cleaning is a gentler alternative for cushions that cannot be machine washed. Steam lifts dirt, mold, and mildew without soaking the foam, as long as the fabric is steam safe. Check the care tag first.

How Do You Get Mold and Mildew Off Outdoor Cushions?

First, know what you are looking at. Mildew is a surface fungus. It looks flat, powdery, and gray or white, and it brushes off fairly easily. Mold goes deeper. It looks fuzzy or raised and often green or black, and it can stain permanently.

On outdoor cushions you are almost always dealing with mildew, and it is very treatable. Pick the method that matches your fabric.

The vinegar method (safe on most fabrics)

  1. Brush off loose mildew outdoors, before wetting, so you do not spread spores.
  2. Mix one cup white vinegar, one tablespoon dish soap, and one gallon of warm water.
  3. Spray or sponge it onto the affected areas.
  4. Let it sit for fifteen to twenty minutes.
  5. Scrub gently with a soft brush in circles.
  6. Rinse well and air dry in the sun.

The borax method (good for heavier mildew)

Borax is a mineral salt and a proven mildew fighter. Dissolve it in warm water per the package, apply, let it dwell, scrub, and rinse. It works without the color risk of chlorine bleach, which makes it a favorite for fabrics you are unsure about.

The oxygen bleach method (for tough stains on non-acrylic fabric)

Oxygen-based bleach like OxiClean lifts set-in mildew stains without the fading risk of chlorine bleach. Mix per the package, apply to stains, let it sit for about thirty minutes, then scrub and rinse.

The chlorine bleach method (solution-dyed acrylic only)

This is where fabric type matters most, which brings us to the biggest point of confusion online.

Is Bleach Safe on Outdoor Cushions?

You will find guides that swear by bleach and guides that say bleach ruins your cushions. Both are right, for different fabrics. Here is how to reconcile them.

On solution-dyed acrylic such as Sunbrella, chlorine bleach is safe when diluted. The official guidance is one cup of bleach and a quarter cup of mild soap per gallon of water. Spray it on, let it soak for up to fifteen minutes, scrub with a soft brush, and rinse thoroughly. Because the color lives inside the fiber, bleach removes the mildew without removing the color.

On printed polyester, olefin, or cotton, chlorine bleach fades the color and can strip the factory water-repellent finish. On these fabrics, use vinegar, borax, or oxygen bleach instead.

Two cautions almost no consumer article mentions:

  • Bleaching removes water repellency. After you use a bleach solution on acrylic, the fabric loses its factory finish. You need to reapply a fabric protector such as a fluorocarbon-based fabric guard to restore water and stain resistance.
  • Bleach and the environment do not mix. Do not use bleach near a pond, pool, garden bed, or any water source it can run into. Wear gloves, work in a ventilated area, and rinse completely.

When you are unsure what your fabric is, do not gamble. Treat it as bleach-sensitive and clean with vinegar or oxygen bleach.

How Do You Remove Specific Stains From Outdoor Cushions?

Different messes need different fixes. Here is a stain chart you can bookmark. Always blot, never rub, since rubbing pushes stains deeper.

Stain What to use How to treat
Oil, sunscreen, grease Cornstarch or baking soda Blot excess, cover with powder, wait ten to fifteen minutes, scrape off, then wash with dish soap and water
Bird droppings Microfiber cloth Lift off as much as possible first, then spot clean; do not rub it in
Tree sap Turpentine or Murphy’s Oil Soap Soften the sap, scrape off excess, then clean with soap and water
Food and drink Dish soap and water Blot, then scrub gently with mild soapy water
Wine or coffee White vinegar solution Blot, apply vinegar and water, let sit, then rinse
Mildew spots Vinegar, borax, or oxygen bleach Match to fabric type, dwell, scrub, rinse

The oil trick is worth calling out. A dry powder like cornstarch or baking soda pulls oil up out of the weave before it sets. Scrape the powder off with the edge of a spoon or a squeegee, then vacuum the residue. Reapply if the mark remains.

How Do You Dry Outdoor Cushions So Mold Does Not Come Back?

This is the step that separates cushions that stay fresh from cushions that smell musty in a week. Cleaning removes today’s mildew. Proper drying stops tomorrow’s.

The problem is the foam core. It holds water long after the surface feels dry. Seal damp foam under a cover and you have built the perfect mold incubator.

Dry the right way:

  • Stand cushions on their edge, not flat, so gravity pulls water out of the foam.
  • Let them dry in direct sun. Sunlight speeds drying and its UV acts as a natural bacteria and odor killer.
  • Give it real time. A thick foam cushion can need a full day of dry weather, not an hour.
  • Confirm the core is dry, not just the surface. Press firmly in the center. If it feels cool or damp, it is not ready.
  • Never store damp cushions. Damp fabric plus a closed deck box equals mildew.

If the weather will not cooperate, dry cushions indoors near a fan, or use a wet vacuum to pull moisture out of the foam after a deep clean.

How Often Should You Clean Outdoor Cushions?

Consistency beats intensity. A quick habit prevents the grime that forces a deep clean. Use this cadence as a starting point and adjust for your climate.

Task How often Why
Brush off dust and debris Weekly, or whenever you are out there Stops dirt from feeding mildew
Rinse with a hose Monthly Clears embedded pollen and grime
Spot clean spills Immediately Fresh stains lift far easier than set ones
Deep clean Twice a season Resets fabric before buildup sets in
Reapply fabric protector After each deep clean Restores water and stain resistance

Humid, rainy, or coastal climates need more frequent attention. So does any patio under heavy tree cover, where sap, pollen, and bird droppings pile up fast.

How Do You Keep Outdoor Cushions Clean Longer?

The cheapest cleaning is the one you avoid. A few habits keep cushions fresh and stretch their lifespan by years.

  • Apply a fabric protector. A fluorocarbon-based fabric guard restores water and stain repellency after cleaning, so spills bead up instead of soaking in.
  • Bring cushions in before heavy rain. Even weather-resistant fabric is more pleasant dry, and non-resistant fabric can soak through and grow mildew.
  • Store non-resistant fabrics overnight. Cotton and similar fabrics do not dry easily and struggle with morning dew.
  • Use a deck box or storage cover for the off-season, and only after cushions are fully dry.
  • Do a ten-second brush-off whenever you pass by. Small, frequent effort beats a weekend of scrubbing.

If pets treat your outdoor sofa as a daybed, vacuum a few times a week. Fur woven into fabric is far harder to remove than fur sitting on top of it.

What Mistakes Should You Avoid When Cleaning Outdoor Cushions?

A few common errors cause most of the damage.

  • Skipping the spot test. Always test any cleaner on a hidden corner, like the underside, before you commit.
  • Using bleach on the wrong fabric. Great on solution-dyed acrylic, ruinous on printed or dyed fabric.
  • Scrubbing too hard with a stiff brush. This frays the weave and wears out the fabric. Gentle circles with a soft brush do more with less damage.
  • Leaving soap in the fabric. Residue attracts dirt faster than clean fabric. Rinse until the water runs clear.
  • Storing cushions before the foam is dry. The single most common cause of returning mildew.
  • Cleaning on grass. You will just swap old stains for green ones.

Is It Cheaper to Clean or Replace Outdoor Cushions?

Almost always cheaper to clean. Replacement cushions for a full patio set can run into the hundreds, while a cleaning session costs the price of soap, vinegar, and an hour of your time.

Cleaning also protects the money you already spent. Performance fabric is built to last for years, but only if the dirt, oils, and mildew that break down fibers are washed off periodically. Regular care is not just about looks. It is the difference between replacing cushions every couple of seasons and keeping them for the better part of a decade.

Replace cushions only when the foam has broken down and lost its support, the fabric is torn or worn through, or mildew has penetrated so deep into the foam that no amount of cleaning removes the smell. Until then, a wash beats a purchase.

Frequently Asked Questions

Can you use a magic eraser on outdoor cushions? For small, localized marks it can help, but test a hidden spot first. Its mild abrasion can dull or lighten some fabrics, so it is not a substitute for a full wash.

How do you clean outdoor cushions that cannot be removed from the frame? Clean them in place. Brush off debris, apply your fabric-appropriate solution seam to seam with a soft brush, rinse with a hose, and let them dry in the sun or under a fan. Steam cleaning also works well when the cushions cannot come off.

Does vinegar damage outdoor fabric? Diluted white vinegar is safe on most outdoor fabrics and is a reliable choice for mold, mildew, and general stains. As always, test a hidden area first, and rinse afterward so no residue is left behind.

How do you get the musty smell out of outdoor cushions? The smell is mildew, and it usually means moisture is trapped in the foam. Clean with a vinegar solution, rinse, then dry the cushions completely in the sun. If the smell survives full drying, the mildew has reached deep into the foam and the cushion may need replacing.

Can you put outdoor cushions in the dryer? No. Heat can shrink covers and warp foam. Always air dry outdoor cushions, standing them on their edge, ideally in direct sunlight.


Cleaning instructions vary by manufacturer. Always check the care label on your specific cushions before using any cleaner, and spot test on a hidden area first. When using bleach, wear gloves, work in a ventilated space, and keep the solution away from lawns, gardens, and water sources.

To get the mildew smell out of clothes, wash them in the hottest safe water with one cup of white vinegar and no detergent, then run a second cycle with one cup of baking soda. For stubborn odor, pre-soak in a vinegar and water solution first, and use oxygen bleach on tough cases. Dry in sunlight to finish. A normal wash fails because it masks the smell instead of killing the mold and bacteria causing it.

That damp, musty smell means mold and bacteria have moved into the fabric fibers. Detergent and a fresh scent spray only cover it up, so the odor returns the moment the clothes get warm or damp again. The fix is to attack the source. This guide climbs from the gentlest method to the strongest, so you use only as much as the smell requires.

Why do clothes smell like mildew even after washing?

Because the smell is alive. It comes from mold and bacteria living deep in the fibers, not from a lack of soap. Regular detergent cleans the surface but often does not kill what is embedded.

Clothes pick up that musty odor for a few predictable reasons:

  • Wet laundry left sitting in the washer too long.
  • Damp storage, like a basement, gym bag, or a closet with poor airflow.
  • A musty washing machine that transfers its own smell onto everything inside it.

That last cause is the sneaky one. If every load comes out musty, the machine itself is likely the source, and cleaning the washer matters as much as treating the clothes.

Method 1: How do you use vinegar to remove mildew smell?

White vinegar is the first line of attack, cheap, non-toxic, and effective. Its acetic acid breaks down the odor-causing bacteria.

  1. Set the washer to the hottest temperature the fabric allows.
  2. Add your musty clothes with one cup of distilled white vinegar and no detergent.
  3. Run a full cycle.

The heat plus the acid work together to break up the grime and bacteria hiding in the fabric pores. For delicate items, keep the water cooler and rely on a soak instead.

Method 2: How do you use baking soda to finish the job?

Baking soda works differently from vinegar. Instead of killing bacteria, it absorbs and neutralizes the odor molecules. Use it as a second pass.

  1. After the vinegar cycle, spread the clothes evenly in the drum.
  2. Add one cup of baking soda (half a cup for a lighter load).
  3. Run again on the hottest safe setting.

Because baking soda is alkaline, it neutralizes what the vinegar loosened, and the two-step sequence handles most everyday mildew smells completely. Do not add vinegar and baking soda to the same cycle expecting more power. They cancel each other out. Run them separately.

Method 3: When should you pre-soak first?

If the smell is set in, start with a soak before you wash. This is your best move for thick fabrics like towels, denim, and fleece that hold odor deep.

  • Mix one part white vinegar to four parts cool water in a tub or sink.
  • Fully submerge the clothes and soak for at least an hour, longer for stubborn cases.
  • Wring out, then run the vinegar wash and baking soda wash above.

A baking soda soak works too: warm water with baking soda for a few hours pulls odor out of dense fibers before the wash even starts.

Method 4: How do you handle really stubborn odor?

When vinegar and baking soda are not enough, step up to oxygen bleach.

Unlike chlorine bleach, oxygen bleach breaks down into oxygen and water, so it is safe for colors and gentler on fabric. Dissolve it per the package directions, soak the clothes, then launder as usual. It is especially good for towels that stay musty through repeated washes.

Save chlorine bleach for whites with visible mold, and never let it touch vinegar.

Method 5: What if there is visible mold on the fabric?

A musty smell with no visible growth is odor only. Fuzzy or slimy black, green, or brown patches are actual mold, and they need removing before you treat the smell.

  1. Take the item outside and brush off the surface mold with a stiff brush, so spores do not spread through your machine.
  2. For sturdy or white fabrics, soak in a solution of one part bleach to three parts water for about 30 minutes. For colors, use oxygen bleach instead.
  3. Rinse, then launder as usual.
  4. If the stain lifts but the smell lingers, follow with the vinegar and baking soda washes.

Always check the care label first. Bleach and hot water can ruin delicate or non-colorfast items.

How does drying affect the mildew smell?

Drying is where you lock in the win or undo it. Sunlight is a natural disinfectant. Its UV rays kill lingering odor-causing bacteria and freshen fabric for free.

  • Hang clothes outdoors in direct sun whenever possible, with space between items for airflow.
  • If you must use a dryer, dry on the hottest safe setting and make sure clothes come out completely dry. Even slightly damp clothes will smell musty again fast.
  • Never leave the finished load sitting in the washer or dryer.

How do you stop mildew smell from coming back?

Prevention is simpler than any of the fixes above:

  • Move wet laundry to the dryer promptly. Do not let it sit.
  • Dry clothes fully before folding or storing them.
  • Store in a dry, airy space. Avoid cramming damp items into gym bags, hampers, or basement closets.
  • Clean your washing machine regularly, especially the gasket and drum, so it stops seeding the smell.
  • Air out gym clothes before tossing them in the hamper.

Interestingly, the vinegar and baking soda method is not new. Household manuals from more than a century ago recommended the same two ingredients for musty laundry, which is a fair sign it actually works.

Frequently asked questions

Does vinegar really get mildew smell out of clothes?

Yes. The acetic acid breaks down the bacteria causing the odor. Wash with a cup of vinegar and no detergent on the hottest safe setting.

Can I use vinegar and baking soda together?

Use them in separate cycles. Combined, they neutralize each other and lose their cleaning power.

Why do my towels still smell after washing?

Towels hold odor deep in thick fibers. Pre-soak them, then try oxygen bleach, and dry them fully, ideally in the sun.

Does sunlight remove musty smells?

Yes. UV rays kill odor-causing bacteria and naturally freshen fabric, which is why line drying works so well.

What if the smell keeps coming back on every load?

Your washing machine is probably the source. Clean the drum, gasket, and drain filter, and stop leaving wet laundry sitting inside.

Yes, you can put solar panels on a metal roof, and a metal roof is arguably the best roof for solar. A standing seam metal roof lets installers clamp panels onto the raised seams with no holes drilled at all, which speeds up the job, protects the warranty, and removes the main cause of solar-related leaks.

If you have a metal roof, or you are weighing one, this is the good news scenario for going solar. The metal outlasts the panels, reflects heat, and often makes mounting cleaner than it would be on shingles. Here is how it works, what to watch for, and the one corrosion detail most guides skip.

Can you put solar panels on a metal roof?

Yes, without question. Older worries about metal interfering with the panels are outdated. Modern mounting systems are built specifically for metal, and installers now treat it as one of the most solar-friendly surfaces there is.

The method changes with the type of metal roof you have, which is the part that actually matters.

Why is a metal roof one of the best roofs for solar?

Three reasons stack up in your favor:

  • The roof outlives the panels. Solar panels are warrantied for around 25 to 30 years. A metal roof lasts 40 to 70. So your roof will not need replacing under the array, which is exactly the headache asphalt owners face when a 15-year shingle roof dies under 25-year panels.
  • Metal reflects heat. It already cuts cooling costs on its own. Pair it with an array and you stack the savings.
  • Panels can run cooler. Because a metal roof does not soak up heat the way asphalt does, panels above it often run a touch cooler, and cooler panels are slightly more efficient.

There is also a timing angle worth naming. If your roof is near end of life, installing a metal roof and solar together avoids paying twice to remove and reinstall the array later.

How are solar panels attached to a standing seam metal roof?

This is the ideal case. A standing seam roof has raised vertical ribs running up the slope. Those seams act as built-in rails.

Installers use non-penetrating clamps that grip the seams. That means:

  • No holes are drilled into the roof surface.
  • No new leak points are created.
  • The roof warranty usually stays intact.
  • Labor is faster and cheaper, because there is no drilling, sealing, or flashing at every mount.

Mount systems from makers like S-5!, QuickMount PV, and EcoFasten are built for exactly this. If you are shopping roofs with solar in mind, standing seam is the profile to ask for.

How do you mount solar panels on a corrugated or ribbed metal roof?

Exposed-fastener roofs, the corrugated and ribbed panels held down by visible screws, do require penetrations. That is fine when it is done right.

Here the installer:

  • Attaches brackets by driving fasteners into the rafters or solid decking.
  • Seals each penetration with gasketed, weatherproof hardware (butyl or EPDM washers) and proper flashing.
  • Places mounts on the high ribs, not the low channels, so water still drains freely.

Done correctly, a penetrated corrugated roof stays watertight for decades. The key is an installer who knows metal, not one guessing from shingle habits.

Do solar panels damage a metal roof or cause leaks?

Not when installed properly. On standing seam, the non-penetrating clamps virtually eliminate leak risk because nothing pierces the roof. On corrugated roofs, sealed and flashed penetrations hold up well.

The failures you read about almost always trace back to the installer, not the roof: wrong bracket for the profile, penetrations in the wrong spot, or cheap unsealed hardware. Choosing a crew experienced with metal is the single biggest protection.

Will mixing metals cause corrosion on my roof?

This is the detail most articles leave out, and it is the one that quietly ruins roofs. When two dissimilar metals touch in the presence of water, they can trigger galvanic corrosion, an electrochemical reaction where the more active metal slowly eats away.

Real examples that cause trouble:

  • Aluminum panel framing and bare steel roofing, with rainwater as the electrolyte between them.
  • Copper flashing or gutter runoff dripping onto a steel roof.

Experienced installers prevent this by:

  • Using stainless steel or galvanized hardware that plays well with the roof metal.
  • Isolating dissimilar metals with gaskets or barrier layers where they meet.
  • Choosing components that sit close together on the galvanic series.

In solar and roofing forums, this is a recurring caution among DIY installers: keep steel and aluminum from forming a wet electrical path, and pick fasteners that will not become the sacrificial metal. Ask your installer directly how they are handling metal compatibility. A good one will have a clear answer.

Does a metal roof affect solar panel performance?

Positively, if anything. The reflective surface and cooler operating temperature can nudge output up slightly. Orientation still rules the outcome: south-facing gives the most production, with west and east as solid alternatives. Installers generally avoid the north slope.

One more design factor unique to metal: thermal movement. Metal expands in heat and contracts in cold, so the mounting system must include hardware that allows the roof to move without stressing the panels or fasteners. This is standard for metal-savvy installers.

Does adding solar void a metal roof warranty?

It can, if penetrations are made improperly. This is another reason standing seam clamps are prized: because they do not pierce the roof, they typically preserve the manufacturer warranty. On penetrated roofs, confirm in writing that the mounting method and flashing keep your warranty valid.

What should you check before installing solar on a metal roof?

Run this checklist before you sign:

  1. Roof age and condition. Solar should go on a sound roof. If the metal is old or damaged, address it first.
  2. Roof profile. Standing seam, corrugated, ribbed, or metal shingle. It sets the mounting method.
  3. Installer experience with metal. Not every solar crew knows metal. Ask for metal-specific references.
  4. Metal compatibility. Confirm the plan to prevent galvanic corrosion.
  5. Warranty impact. Get written confirmation the mount preserves your roof warranty.
  6. Listed racking. Ask that the mounting system is UL 2703 listed for safety and durability.
  7. Current incentives. Federal and state solar programs change, so verify what you currently qualify for before budgeting.

Frequently asked questions

Is a standing seam metal roof better for solar than shingles?

Yes. No-drill clamps make it cleaner, faster, lower-risk, and longer-lasting than a typical shingle mount.

Can you install solar on any metal roof?

Effectively yes, but the method differs. Standing seam uses clamps, corrugated and ribbed use sealed penetrations, and metal shingles use special mounts.

Will solar panels make my metal roof leak?

Not with a proper install. Standing seam clamps make no holes, and penetrated roofs are sealed and flashed.

Do metal roofs and solar save more energy together?

Yes. The roof reflects heat and lowers cooling costs, and the array generates power, so the savings compound.

How long will the system last on a metal roof?

The panels are rated around 25 to 30 years, and the metal roof underneath commonly lasts 40 to 70, so you will not reroof under the array.

No, a metal roof is not cheaper than shingles upfront. It costs roughly 2 to 3 times more to install. But over a full lifespan it often costs the same or less per year, because one metal roof outlives two or three shingle roofs. The right answer depends entirely on how long you plan to keep the house.

This is the question where the headline and the truth point in opposite directions. Ask “which is cheaper today” and shingles win easily. Ask “which is cheaper over the life of the house” and metal frequently pulls ahead. Here is the head-to-head, with the cost-per-year math most comparisons leave out.

Is a metal roof cheaper than shingles upfront?

No. Shingles are clearly cheaper the day the roof goes on.

Factor Asphalt shingles Metal roof
Installed cost per sq ft $4 to $12 $8 to $25
Typical full roof $7,500 to $18,000 $15,000 to $40,000
Rough average ~$10,000 ~$22,000
Lifespan 15 to 30 years 40 to 70+ years

On a standard 2,000 square foot home, shingles commonly land around $10,000 to $16,000, while metal runs about $20,000 to $36,000. Copper, the premium metal, can cost up to seven times a basic asphalt roof.

So on day one, shingles win by a wide margin.

How much more does a metal roof cost than shingles?

Plan on metal costing about 1.5 to 3 times a comparable shingle roof. In raw dollars, the premium is often $7,000 to $21,000 depending on home size and metal type.

What narrows or widens that gap:

  • Metal type. Corrugated steel and metal shingle panels are cheaper than standing seam. Copper and zinc are the most expensive.
  • Roof complexity. Valleys, dormers, and steep pitch raise metal’s labor more than shingles’, because metal is precision work.
  • Region and labor rates. Both materials swing with local pricing.

Is a metal roof cheaper than shingles over time?

Here is where the story flips. The fair comparison is not sticker to sticker. It is cost per year of useful life: divide the installed price by how long the roof actually lasts.

Scenario Install cost Lifespan Cost per year
Architectural shingles $12,000 25 years ~$480
Standing seam metal $28,000 55 years ~$509

The per-year numbers are almost the same, even though the metal roof costs more than double upfront. And that table does not yet count the replacements you skip.

The replacement math: in the time one metal roof lasts, you would typically install shingles two to three times. Each of those reroofs carries its own tear-off, labor, and disposal. Once you add two future shingle replacements at rising prices, metal’s lifetime total often comes out even or lower.

What long-term savings make metal more affordable?

Cost per year is only part of it. Metal quietly pays you back in ways shingles do not:

  • Energy savings. Metal reflects solar heat instead of absorbing it, trimming cooling bills. Shingles soak up heat.
  • Insurance discounts. Fire resistance and high impact ratings can lower premiums with many insurers.
  • Fewer replacements. You avoid the repeated tear-off and reinstall cycle of shingles.
  • Resale value. A long-life metal roof is a selling point and can lift home value.
  • Lower maintenance. Metal generally needs less upkeep across its life.

Stack these on top of the near-even cost per year, and the long-run picture tilts toward metal for owners who stay put.

When are shingles the cheaper, smarter choice?

Shingles are not the loser here. They are the right call in plenty of cases:

  • You plan to move within 10 to 15 years. You will not be there long enough to collect metal’s long-term payback.
  • Cash upfront is the constraint. Shingles cost half as much today, full stop.
  • You want easy, familiar repairs. Nearly every roofer works with asphalt, and matching or repairing it is simple and cheap.
  • HOA or neighborhood style favors shingles. Aesthetics and rules sometimes decide it.

When does a metal roof actually save you money?

Use this quick decision matrix:

Your situation Cheaper choice
Staying under 15 years Shingles
Forever home or staying 20+ years Metal
Tightest upfront budget Shingles
Hail, wildfire, or hurricane zone Metal
Want lowest cost per year of life Roughly even, edge to metal
Planning solar panels Metal (roof outlasts the panels)
Prioritizing resale value Metal

The pattern is clear: the longer your time horizon and the harsher your climate, the more metal makes financial sense.

What do homeowners say after choosing each?

Lived experience lines up with the math. Across roofing forums and Reddit’s home improvement threads, a consistent pattern shows up.

Homeowners who chose metal rarely report regret. The common refrain is that the higher upfront cost stung once, then stopped mattering as the roof simply kept doing its job. In a large homeowner survey, the biggest frustration during any reroof was not the material at all. It was the noise, dust, and mess of the project itself, and about 1 in 5 wished they had gathered more quotes first.

Homeowners who chose shingles tend to be happy with the lower upfront cost, but the recurring theme is awareness that they are on a repeating clock. The savings are real now, and the next replacement is already on the calendar.

The practical takeaway from these communities is the same for both camps: get several itemized quotes, and choose based on how long you will own the home, not on the sticker alone.

The verdict

Is a metal roof cheaper than shingles? Not today. Sometimes over a lifetime. It depends on your horizon.

  • Short stay or tight budget: shingles are cheaper and the smart pick.
  • Long stay, harsh climate, or planning solar: metal’s cost per year and skipped replacements make it the better long-term value.

Run your own numbers on cost per year, factor in the replacements you would skip, and the answer for your specific home becomes obvious.

Frequently asked questions

Why is a metal roof so much more expensive than shingles?

Higher material cost and skilled, precise installation. Metal work demands specialized labor that shingles do not.

Does a metal roof pay for itself?

Often, over a long ownership horizon, through energy savings, insurance discounts, and avoided replacements. Over a short stay, usually not.

Which lasts longer, metal or shingles?

Metal, by a wide margin. Metal lasts 40 to 70-plus years versus 15 to 30 for asphalt.

Is a metal roof worth it for resale?

It can lift value and appeal, especially in regions where longevity and storm resistance matter to buyers.

Are metal roofs loud in the rain?

Not with modern installation. Solid decking and underlayment muffle sound to about the level of a shingle roof.

Quick answer: The most durable roofing materials, from longest-lasting to shortest, are slate (75 to 200 years), clay tile (50 to 100), concrete tile (50 to 75), metal (40 to 70+), synthetic composite (40 to 50), wood shakes (30 to 50), and asphalt shingles (15 to 30). Slate is the overall durability champion. Metal is the best all-around balance of lifespan, weight, and cost.

Durability is not one number. A material can last a century yet crack under a dropped branch, or shrug off hail while quietly failing at the flashing. This ranking sorts the common options by real-world lifespan, then explains what actually keeps a roof alive far longer than the label promises.

What is the most durable roofing material?

Slate. Cut from natural stone, it resists fire, moisture, insects, and temperature swings better than anything else on a home. Properly installed, it can outlive the house.

Here is the full durability ranking at a glance:

Rank Material Typical lifespan Installed cost per sq ft Standout strength
1 Slate 75 to 200 years $12 to $30 Near-permanent stone
2 Clay tile 50 to 100 years $12 to $25 Heat and fire resistance
3 Concrete tile 50 to 75 years $10 to $20 Tile durability, lower cost
4 Metal 40 to 70+ years $6 to $18 Strength at low weight
5 Synthetic composite 40 to 50 years $5 to $14 Impact resistance, light
6 Wood shakes 30 to 50 years $6 to $15 Natural insect resistance
7 Asphalt (architectural) 25 to 30 years $4.50 to $12 Value and availability

Note that copper, a premium metal, sits in a class of its own and can pass 100 years, developing a green patina as it ages.

What makes slate the most durable roofing material?

Slate is stone, so it does not rot, burn, or feed insects. Individual tiles are installed one at a time, which also means a single cracked tile can be swapped without redoing the roof.

The catch is weight and cost. Slate is heavy enough that many homes need added structural support before it can go on. It is also among the most expensive roofs to buy and install, and it needs a roofer who specializes in it.

How durable are clay and concrete tiles?

Both are heavyweights in every sense. Clay tile commonly lasts 50 to 100 years and thrives in hot, sunny, and coastal climates. Concrete tile runs 50 to 75 years at a lower price, trading a little longevity for value.

They share slate’s main limitation: weight. Tile roofs usually require reinforced framing. Damaged tiles can be replaced one at a time, which keeps long-term repairs simple.

How durable is a metal roof?

Metal is the sweet spot for most homeowners chasing longevity without a structural overhaul. Steel and aluminum standing seam roofs last 40 to 70 years or more, and they do it at a fraction of the weight of tile or slate.

Metal also brings advantages the stone and tile options do not:

  • Fire resistance and strong performance in high wind.
  • Heat reflection, which lowers cooling costs in summer.
  • Low maintenance across its life.

Copper is the elite tier, lasting a century or longer. Steel and aluminum deliver most of the benefit for far less.

Is synthetic composite roofing actually durable?

This is the underrated middle ground most articles skim past. Modern synthetic (composite) roofing is engineered to mimic slate or cedar shake while weighing a fraction as much.

It lasts 40 to 50 years, resists impact and fire, will not chip or fade like the natural materials it imitates, and needs almost no upkeep. Because it is light, it usually skips the structural reinforcement that real slate and tile demand. For homeowners who want the slate look and lifespan without the weight and cost, it is a serious contender.

How long do wood shakes and asphalt shingles last?

Wood shakes, especially cedar, last 30 to 50 years with care. Cedar’s natural oils resist insects and decay. The trade-off is maintenance and lower fire resistance unless treated.

Asphalt shingles are the country’s default because they are cheap and easy to install, not because they last longest. Basic three-tab shingles give 15 to 20 years. Thicker architectural shingles reach 25 to 30, and premium designer shingles, sometimes modified with SBS for impact resistance, can push a little further.

What actually determines how long a roof lasts?

The label lifespan assumes a good install and a fair climate. Reality adjusts it, sometimes sharply. Roofers and homeowners in roofing communities repeat the same truth: most roofs fail at the details, not the field.

The real drivers of lifespan:

  • Installation quality. A premium material installed poorly fails early. This is the single biggest variable.
  • Ventilation. Trapped attic heat and moisture cook shingles and rot decking from below.
  • Flashing and penetrations. Leaks almost always start at chimneys, valleys, and vents, not the middle of the roof. Good flashing outlives cheap flashing.
  • Underlayment. The waterproof layer under the surface is your backup. It matters as much as the visible material.
  • Climate. Freeze-thaw cycles, hail, relentless UV, and coastal salt each shorten life in their own way. Match the material to the weather it will face.
  • Maintenance. Routine inspections and prompt repairs extend any roof. Neglect shortens every one.

An impact rating you can ask for by name: UL 2218 Class 4 is the top impact grade, and in hail-prone regions it can lower your insurance premium as well as your risk.

Is the most durable roof the right choice for your home?

Not always, and this is the nuance top-ranking pages tend to bury. The most durable roof and the best roof for you are different questions.

Ask yourself:

  • How long will you stay? If you plan to move within a decade, a 100-year slate roof rarely pays back. Its value shows up over decades you will not be there for.
  • Can your home carry the weight? Slate and tile may need structural reinforcement, which adds real cost before a single tile goes on.
  • What is your climate? Metal excels in wildfire and hurricane zones. Tile loves heat. Wood struggles with fire and moisture.
  • What is your budget horizon? Compare cost per year of life, not just the sticker. A pricier roof that lasts three times as long can cost the same or less per year.

Frequently asked questions

Which roofing material lasts the longest?

Slate, at 75 to over 200 years. Copper is a close second among metals at 100-plus years.

What is the most durable roof for the money?

Metal offers the best balance of long life, light weight, and moderate cost for most homes.

Is a metal roof more durable than shingles?

Yes. Metal lasts 40 to 70-plus years versus 15 to 30 for asphalt, and it handles wind and fire better.

Check more detailed info Is a Metal Roof Cheaper Than Shingles

Does a durable roof lower insurance costs?

It can. Fire-resistant materials and Class 4 impact ratings often earn premium discounts, though this varies by insurer and region.

What makes a roof fail before its expected lifespan?

Poor installation, bad ventilation, and failed flashing, far more often than the roofing material itself wearing out.

Quick answer: To clean a washing machine, run an empty hot cycle with two cups of white vinegar (four for a top loader) or a washer cleaning tablet, then scrub the rubber gasket, detergent dispensers, and the drain filter by hand. Wipe everything dry and leave the door open to air out. Modern high-efficiency machines use so little water that they never rinse themselves clean, which is exactly why they start to smell.

The musty odor in your laundry usually is not the clothes. It is the machine. Soap scum, body oil, and trapped moisture feed mold and bacteria in the parts you never see. This guide cleans the washer one part at a time, calls out where front loaders and top loaders differ, and covers the filter almost nobody knows about.

Why does a washing machine start to smell in the first place?

Because it no longer cleans itself. Older machines flooded the drum with water. Modern high-efficiency (HE) machines use a fraction of that, so residue is left behind after every load.

That residue is a buffet for mold and bacteria. Add the warm, dark, damp environment inside a sealed door, and you get the classic musty smell that transfers straight onto clean laundry. Front loaders are the most prone, because their door gasket traps water in its folds.

What do you need to clean a washing machine?

A short, cheap kit handles everything:

  • White vinegar, to dissolve soap scum and mineral deposits.
  • Baking soda, as a mild scrub and deodorizer.
  • Chlorine bleach, for visible mold and heavy bacteria (used separately, never with vinegar).
  • A washing machine cleaning tablet such as Affresh, optional but convenient.
  • A microfiber cloth, an old toothbrush, and a soft brush.
  • A spray bottle for a one-to-one water and vinegar mix.

One safety rule above all: never mix bleach and vinegar. Together they release toxic fumes. If you use both, rinse thoroughly between them.

How do you clean the drum?

The drum is where residue and bacteria collect, so it gets the main treatment.

  1. Empty the machine completely.
  2. Add two cups of white vinegar to the drum or dispenser for a front loader, or four cups for a top loader. Or drop in a cleaning tablet instead.
  3. Run the longest, hottest cycle, or a dedicated “clean washer” or “sanitize” cycle if your machine has one.
  4. For a top loader, you can pause the cycle mid-fill and let the hot vinegar water soak for 30 to 60 minutes before letting it finish.
  5. Run an extra rinse and spin afterward to flush out everything.

Vinegar breaks down soap scum and mineral scale. For a sulfur or sewage smell driven by bacteria, use bleach instead of vinegar in this step, then rinse fully.

How do you clean the rubber gasket on a front loader?

This is the number one source of front-load odor, and the part most people skip. The gasket is warm, dark, and constantly damp.

  1. Pull back the folds of the rubber seal and remove trapped hair, lint, coins, and gunk.
  2. Spray the gasket with your vinegar solution and let it sit. Tucking a vinegar-soaked cloth into the fold for an hour helps on stubborn buildup.
  3. Scrub the grooves and corners with an old toothbrush.
  4. Wipe clean and dry.

There is a real debate worth knowing about here. Some cleaning pros favor vinegar on the gasket, arguing bleach only kills surface mold and can degrade the rubber. Others, including appliance-care brand reps, recommend scrubbing visible mold with a diluted bleach solution (around 10 percent) to disinfect. Both camps agree on one thing: do not use them together, and wipe the gasket bone-dry afterward. If mold keeps returning in the rubber, the seal may eventually need replacing.

How do you clean the dispensers and door?

Detergent and fabric softener leave sticky residue that grows mold.

  • Remove the dispenser drawers if they come out, and wash them in warm, soapy water. Use a toothbrush on tight corners.
  • If they do not come out, wipe them thoroughly with a vinegar-dampened cloth.
  • Wipe the door glass, knobs, and the top edge of the drum opening, all the spots residue hides.

How do you clean the drain filter almost nobody knows about?

Here is the part most guides bury or miss entirely. Most front loaders have a drain pump filter, usually behind a small hatch at the bottom front of the machine. It catches coins, lint, and hair. When it clogs, water drains slowly and the machine turns musty.

  1. Lay down a towel and a shallow pan, because water will spill out.
  2. Open the hatch and slowly unscrew the filter cap to drain the water.
  3. Pull out the filter, remove the debris, and rinse it under the tap.
  4. Wipe the housing, then reseat the filter snugly and close the hatch.

Check this every one to three months. A neglected filter is a hidden cause of both odor and poor drainage.

How is cleaning a top loader different from a front loader?

The parts and problem spots differ, so the routine adjusts:

Part or issue Front loader Top loader
Vinegar for drum cycle About 2 cups About 4 cups
Door gasket Mold-prone, scrub every time No gasket to worry about
Standing water Rarely pools Can pool and go musty at the bottom
Drain filter Usually has one to clean Often none
After each load Leave door ajar Leave lid up to dry out

Top loaders without a center agitator behave a bit like front loaders and appreciate the same drum treatment.

How often should you clean your washing machine?

Task Frequency
Full drum clean cycle Monthly, or every 30 washes
Wipe gasket and door After every wash (front loader)
Clean dispensers Monthly
Clean drain filter Every 1 to 3 months
Deep descale (hard water) Every few months

How do you keep a washing machine from smelling again?

Prevention is easier than the cure. Habits that laundry technicians and pro cleaners recommend:

  • Leave the door or lid open between loads so the drum dries out.
  • Wipe the gasket dry after each front-load wash.
  • Use HE detergent in HE machines, and use less than you think. Overdosing detergent is a top cause of buildup and odor.
  • Do not leave wet laundry sitting in the drum. This is the fastest way to breed mildew, in the machine and in the clothes.
  • Run hot loads occasionally, not only cold, to keep residue from accumulating.

That last point ties into a bigger truth: a musty washer makes musty laundry. If your clothes come out smelling off even when clean, the machine itself is often the real culprit, and this routine fixes it at the source.

Frequently asked questions

Can I clean my washing machine with just vinegar?

Yes, for routine odor and soap scum. Use bleach only for visible mold or a strong bacterial smell, and never mix the two.

Is bleach or vinegar better for washer mold?

Opinions differ. Vinegar is gentler on rubber and dissolves scum. A diluted bleach solution disinfects visible mold more aggressively. Pick one, rinse well, and dry the gasket.

Why does my washing machine smell even after cleaning?

Check the drain filter and the gasket folds, the two most overlooked spots, and make sure you are drying the machine out between loads.

How often should I clean my washing machine?

A full clean cycle monthly, gasket wipes after each front-load wash, and the drain filter every one to three months.

Does leaving the washer door open really help?

Yes. It lets the drum and gasket dry, which stops the mold and mildew that cause odor.